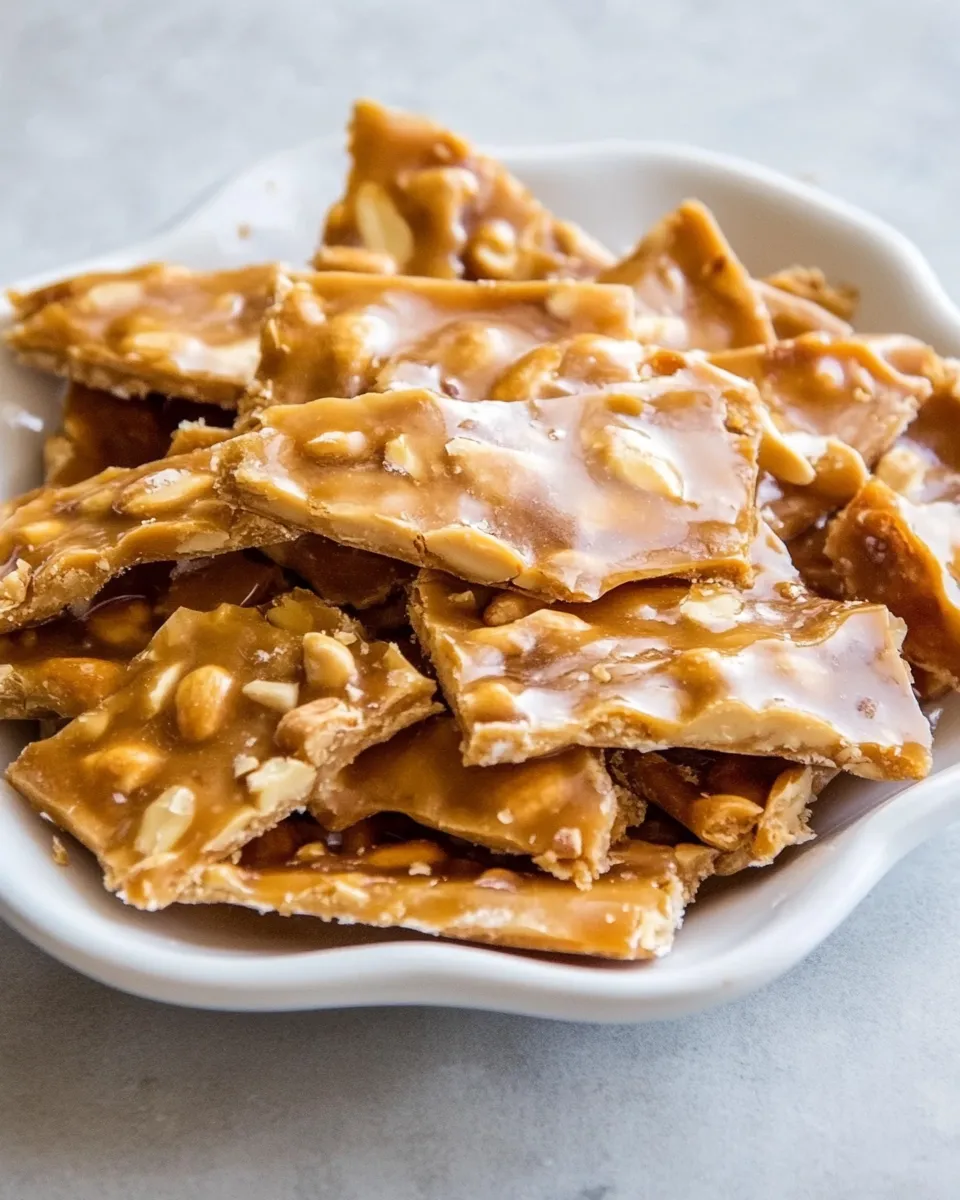
Easy Homemade Peanut Brittle
Peanut brittle is the ultimate sweet and crunchy treat that brings back fond memories of childhood candy shops and festive celebrations. This Easy Homemade Peanut Brittle recipe combines simplicity with deliciousness, making it a must-try for anyone looking to satisfy their sweet tooth. Perfect for sharing with friends and family, or just indulging yourself, this classic candy bursts with flavor and texture. Let’s dive into the world of making your very own peanut brittle in the comfort of your kitchen!
The Upside of Easy Homemade Peanut Brittle

Making Easy Homemade Peanut Brittle at home not only allows you to control the ingredients but also ensures that you get a fresh, delicious product without any additives or preservatives. The satisfaction of creating something so delightful from scratch is unmatched. Plus, it makes for a wonderful homemade gift during holidays or special occasions! With just a handful of ingredients and minimal effort, you can whip up a batch that will impress anyone lucky enough to try it.
What We’re Using
Here’s a closer look at the ingredients that make up this delectable treat:
- 2 cups sugar: The star ingredient that gives the candy its sweetness and crunch.
- 1 cup light corn syrup: This helps to achieve that perfect chewy texture and prevents the sugar from crystallizing.
- 1/2 cup water: Used to dissolve the sugar and corn syrup, creating a smooth mixture.
- 2 cups salted roasted peanuts: The nutty flavor and crunch that make peanut brittle a favorite.
- 2 tablespoons butter: Adds richness and a lovely flavor to the brittle.
- 1 1/2 teaspoons baking soda: This is crucial for creating that light and airy texture.
- 1 1/2 teaspoons vanilla: Enhances the overall flavor profile of the brittle.
Equipment & Tools
Before we get started, gather the following tools to make your candy-making experience seamless:
- Heavy-bottomed saucepan: A sturdy pot will help distribute heat evenly and prevent burning.
- Wooden spoon: Perfect for stirring the mixture without scratching your pots.
- Candy thermometer: Essential for monitoring the temperature to achieve the perfect consistency.
- Baking sheet: A flat surface where the brittle will cool and harden.
- Parchment paper: Prevents sticking and makes cleanup easier.
- Rubber spatula: Great for spreading the mixture evenly on the baking sheet.
Easy Homemade Peanut Brittle, Made Easy

Let’s get down to the fun part—making your own Easy Homemade Peanut Brittle! Follow these simple steps to create your candy masterpiece.
Step 1: Prepare Your Workspace
Start by lining a baking sheet with parchment paper. This will help prevent the brittle from sticking once it cools. If you have a silicone baking mat, that also works beautifully.
Step 2: Combine the Ingredients
In your heavy-bottomed saucepan, combine the sugar, light corn syrup, and water. Stir gently to mix all the ingredients together, but avoid stirring too vigorously to prevent crystallization.
Step 3: Heat the Mixture
Place the saucepan over medium heat and attach your candy thermometer. Allow the mixture to come to a boil without stirring. Keep an eye on the temperature as it rises.
Step 4: Reach the Right Temperature
Continue boiling until the mixture reaches a temperature of 300°F (hard crack stage). This is crucial for achieving that perfect brittle texture. Once you reach this temperature, remove the saucepan from the heat.
Step 5: Add Peanuts and Butter
Quickly stir in the salted roasted peanuts and butter until fully incorporated. The mixture will bubble up, so be careful!
Step 6: Add Baking Soda and Vanilla
Now, add the baking soda and vanilla. Be prepared for a dramatic fizzing reaction! This is what gives the brittle its light texture, so mix well until combined.
Step 7: Spread the Mixture
Immediately pour the mixture onto your prepared baking sheet. Use a rubber spatula to spread it out evenly. Work quickly, as the mixture will begin to harden as it cools.
Step 8: Let It Cool
Allow the peanut brittle to cool completely at room temperature. This could take about an hour, depending on the thickness of your brittle. Once cooled, you can break it into pieces.
Allergy-Friendly Swaps

If you or someone you know has allergies, here are a few swaps you can make while still enjoying your Easy Homemade Peanut Brittle:
- Nut-Free: Substitute the peanuts with sunflower seeds or pumpkin seeds for a nut-free version.
- Vegan: Use vegan butter instead of regular butter to make it dairy-free.
- Low Sugar: Experiment with sugar alternatives like erythritol or coconut sugar for a lower-sugar option.
Frequent Missteps to Avoid
When making Easy Homemade Peanut Brittle, it’s important to avoid these common pitfalls:
- Not using a candy thermometer: This can lead to undercooking or overcooking the sugar, resulting in a poor texture.
- Stirring too much: Once the mixture begins boiling, resist the urge to stir as this can cause crystallization.
- Not preparing the baking sheet: Skipping the parchment paper can lead to a sticky mess that’s difficult to clean up.
- Cooling too quickly: Avoid placing the brittle in a cold area to cool, as sudden temperature changes can cause it to crack.
Keep-It-Fresh Plan
To ensure your Easy Homemade Peanut Brittle stays fresh and delicious, follow these tips:
- Store in an airtight container: Keep the brittle in an airtight container to prevent moisture from making it sticky.
- Keep in a cool, dry place: Avoid storing your brittle in the fridge, as this can cause it to become chewy. A pantry is ideal.
- Consume within two weeks: For the best flavor and texture, try to enjoy your brittle within two weeks of making it.
Ask & Learn
Can I use raw peanuts instead of roasted peanuts?
While you can use raw peanuts, roasted peanuts add a depth of flavor and crunch that is essential for traditional peanut brittle. If using raw peanuts, consider roasting them in the oven beforehand for the best results.
What happens if I overcook the sugar mixture?
If the sugar mixture is overcooked, it will become too hard and result in brittle that’s difficult to chew. Make sure to monitor the temperature closely to avoid this issue.
Can I add other ingredients like chocolate or spices?
Absolutely! You can add chocolate drizzle on top or sprinkle in some cinnamon or cayenne pepper for a spicy kick once the brittle has cooled slightly. Just be sure not to add these during the cooking process, as they can alter the texture.
Is it possible to make peanut brittle without corn syrup?
Yes, you can substitute corn syrup with honey or maple syrup for a different flavor profile. However, keep in mind that it may alter the texture slightly.
Let’s Eat
Now that you’ve mastered the art of making Easy Homemade Peanut Brittle, it’s time to enjoy the fruits of your labor! Whether you’re sharing it with loved ones or keeping it all to yourself, this sweet treat is sure to bring joy and satisfaction. The buttery, nutty crunch of homemade peanut brittle is a delightful addition to any gathering, and the best part? You made it yourself! So go ahead, indulge a little, and relish every bite of your delicious creation!
Easy Homemade Peanut Brittle
Ingredients
Equipment
Method
- Step 1: Prepare Your Workspace - Line a baking sheet with parchment paper.
- Step 2: Combine the Ingredients - In a heavy-bottomed saucepan, combine sugar, light corn syrup, and water.
- Step 3: Heat the Mixture - Place the saucepan over medium heat and attach your candy thermometer. Allow the mixture to boil without stirring.
- Step 4: Reach the Right Temperature - Boil until the mixture reaches 300°F (hard crack stage), then remove from heat.
- Step 5: Add Peanuts and Butter - Quickly stir in peanuts and butter until fully incorporated.
- Step 6: Add Baking Soda and Vanilla - Mix in baking soda and vanilla, watching for fizzing.
- Step 7: Spread the Mixture - Pour the mixture onto the prepared baking sheet and spread it out evenly.
- Step 8: Let It Cool - Allow the peanut brittle to cool completely at room temperature before breaking it into pieces.
Notes
- Store in an airtight container to keep it fresh.
- Avoid the fridge to prevent chewiness; keep in a cool, dry place.
- Enjoy within two weeks for the best flavor and texture.