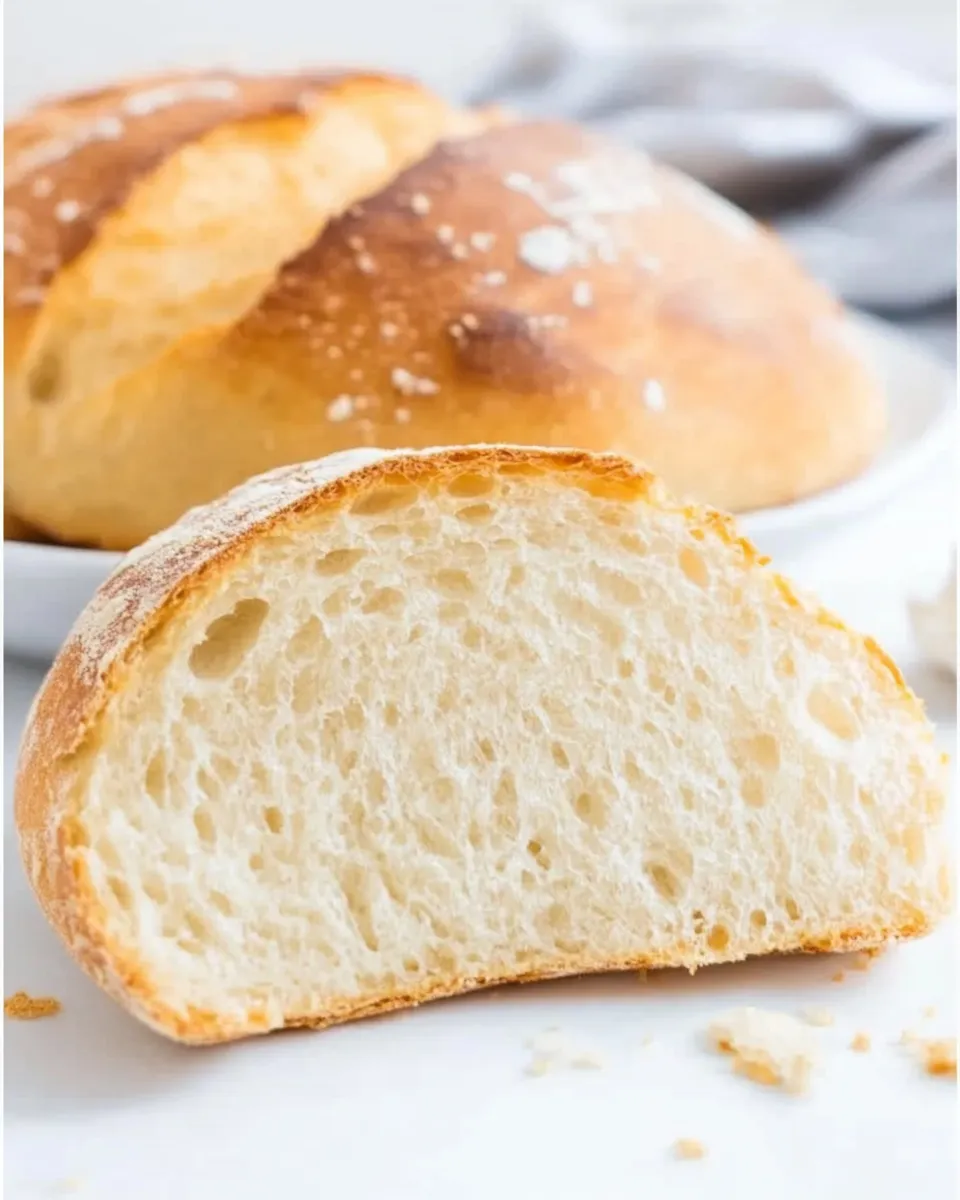
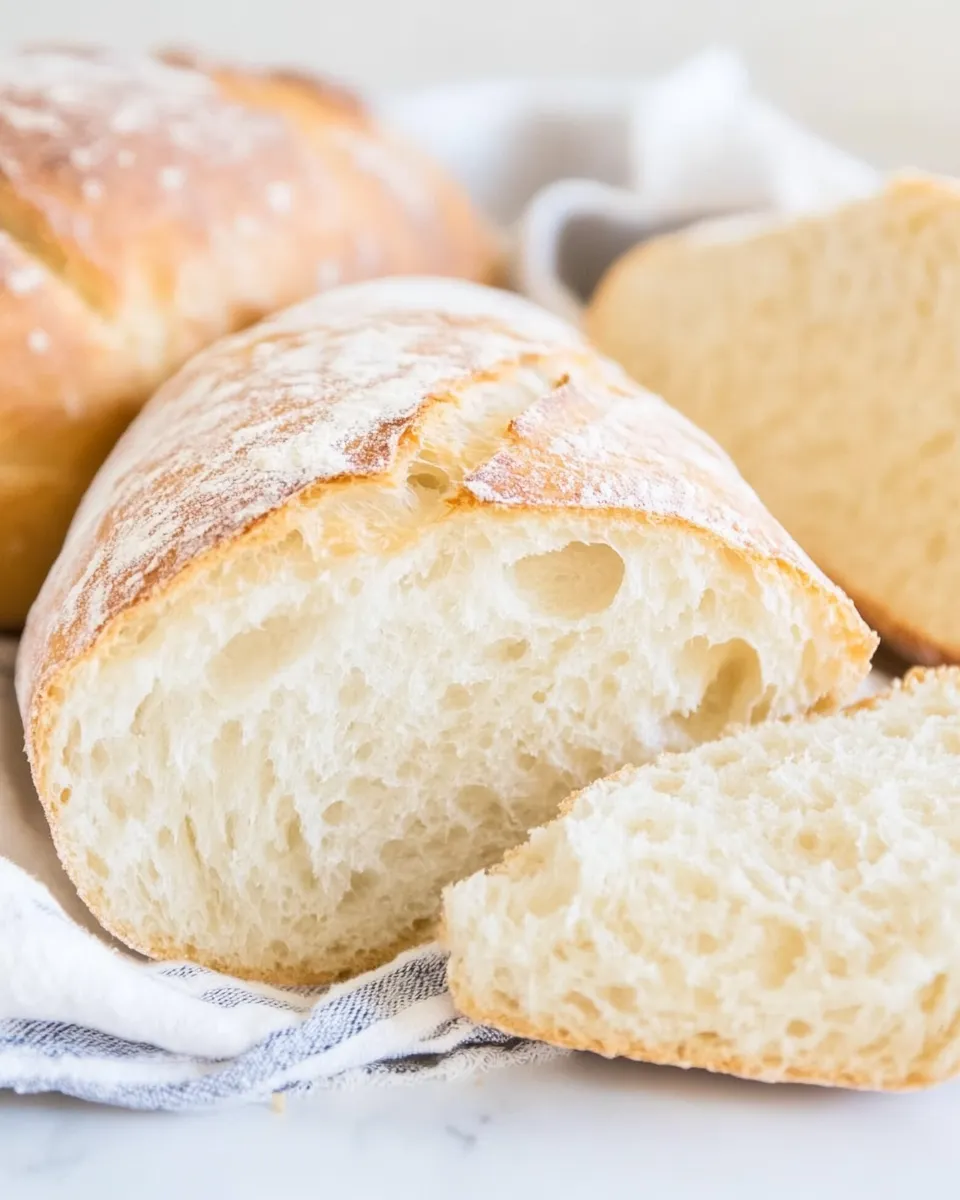
Rustic Italian Bread
There’s something truly magical about the crackling crust and airy crumb of Rustic Italian Bread. It’s the kind of bread that fills your kitchen with the warm aroma of freshly baked goodness and transports you straight to an Italian countryside bakery. This bread is perfect for everything from hearty sandwiches to dipping into rich olive oil or a vibrant tomato sauce. If you’ve been searching for a straightforward, no-fuss recipe that delivers that authentic, crusty loaf every time, you’re in the right place. Let’s dive into the art of creating this timeless classic.
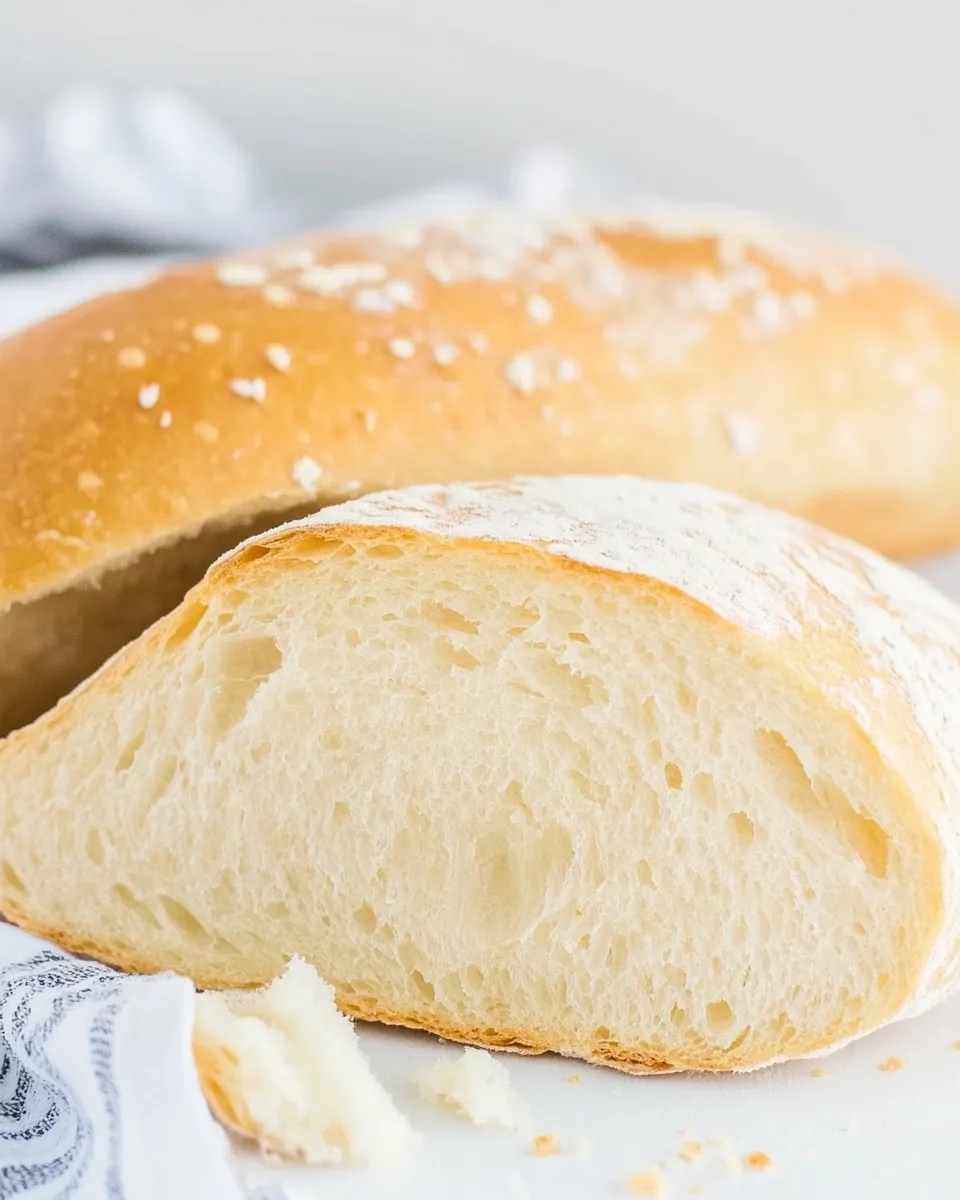
Why This Rustic Italian Bread Stands Out
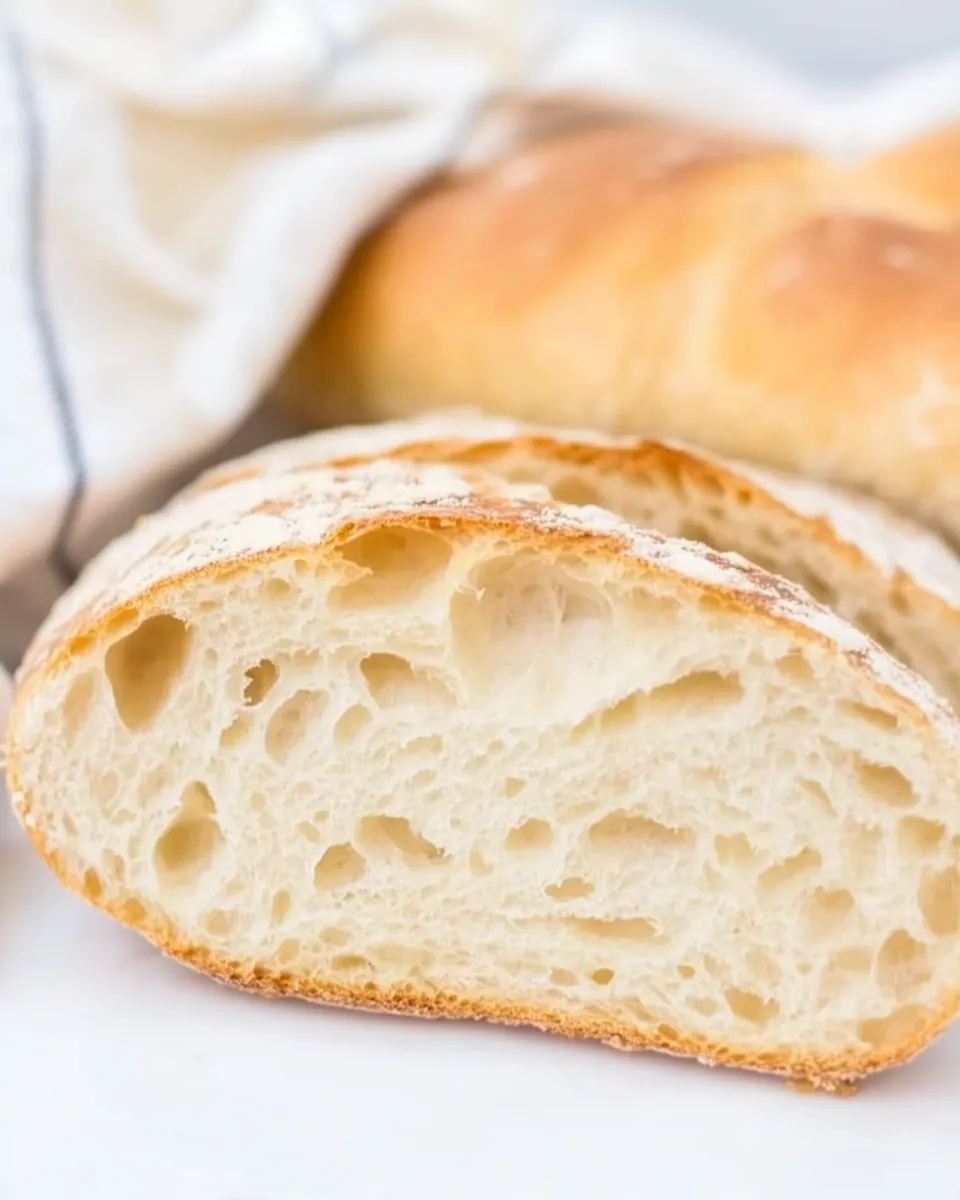
The beauty of this Rustic Italian Bread lies in its simplicity and texture. Unlike many breads that rely on fancy ingredients or complicated techniques, this recipe uses just a handful of pantry staples and minimal fuss. The combination of bread flour, instant yeast, and water, alongside a touch of salt, creates a loaf that boasts a chewy crust with a tender, open crumb inside.
One of the standout features is the two-stage mixing process that allows the dough to develop flavor and structure naturally. The long hydration and fermentation encourage the flour to fully hydrate, resulting in that perfect balance of chewiness and airiness. Plus, the crust comes out beautifully rustic, with just the right amount of crunch to make every bite a delight.
This bread is incredibly versatile: serve it alongside your favorite pasta, use it for sandwiches, or enjoy it simply with butter and a sprinkle of sea salt. It’s approachable for bakers of all skill levels and requires no fancy equipment or intimidating techniques.
Ingredient List
- 2 cups (250g) bread flour – for the initial dough base
- 1/4 teaspoon instant yeast – helps the dough rise gently
- 1 cup (250ml) water, at room temperature – hydrates the dough
- 3 cups (375g) bread flour – added after initial mixing for structure
- 1 teaspoon instant yeast – boosts the rise in the second stage
- 1 1/3 cups (333.33ml) water, at room temperature – added to develop the dough’s hydration
- 2 teaspoons salt – enhances flavor and controls fermentation
What You’ll Need (Gear)
- Large mixing bowl – for combining and proofing the dough
- Dough scraper or spatula – to handle sticky dough easily
- Kitchen scale – for precise ingredient measurements
- Clean kitchen towel or plastic wrap – to cover dough during rises
- Baking sheet or Dutch oven – for baking the bread
- Parchment paper – prevents sticking and makes transfer easier
- Cooling rack – to cool the bread evenly after baking
Rustic Italian Bread Made Stepwise
Step 1: Mix the Initial Dough
In a large mixing bowl, combine 2 cups (250g) bread flour with 1/4 teaspoon instant yeast. Pour in 1 cup (250ml) water at room temperature. Stir everything together with a spatula or wooden spoon until a shaggy, sticky dough forms. Cover the bowl with a clean kitchen towel or plastic wrap and let it rest for 30 minutes. This rest period, called autolyse, hydrates the flour and kickstarts gluten development.
Step 2: Add Remaining Ingredients
After the initial rest, add the remaining 3 cups (375g) bread flour, 1 teaspoon instant yeast, 1 1/3 cups (333.33ml) water, and 2 teaspoons salt to the bowl. Mix everything until well combined. The dough will be sticky and a bit loose — that’s exactly what you want for this style of bread.
Step 3: Bulk Fermentation and Stretch & Fold
Cover the bowl again and let the dough ferment at room temperature for about 1 hour. Every 20 minutes during this hour, perform a series of stretch and folds: wet your hand, reach under the dough, stretch it upwards, and fold it over itself. This technique strengthens the dough’s gluten without traditional kneading.
Step 4: Shape the Dough
After the bulk fermentation, turn the dough out onto a lightly floured surface. With floured hands, gently shape the dough into a rough round loaf. Be careful not to deflate all the air bubbles — these create the rustic crumb. Place the shaped dough seam-side down on a piece of parchment paper.
Step 5: Final Proof
Cover the dough loosely with a kitchen towel and let it rise for another 45 minutes to 1 hour, until it looks slightly puffy but not doubled.
Step 6: Bake the Bread
Preheat your oven to 450°F (230°C). If you have a Dutch oven, place it inside the oven while it preheats to get it hot. Otherwise, a baking sheet works fine. When ready, carefully transfer the dough with the parchment paper into the hot Dutch oven or onto the baking sheet. Score the top of the loaf with a sharp knife or razor blade to allow for expansion.
Bake covered (if using Dutch oven) for 20 minutes, then remove the cover and bake for another 20 to 25 minutes until the crust is deeply golden and crackly. If you’re using a baking sheet, you can create steam by placing a pan of hot water on the bottom rack during the first 15 minutes of baking.
Step 7: Cool and Enjoy
Remove the bread from the oven and transfer it to a cooling rack. Let it cool completely before slicing — this allows the crumb to set perfectly. Enjoy the fruits of your labor with a drizzle of olive oil or a smear of your favorite spread!
Ingredient Flex Options
- Swap bread flour for all-purpose flour for a slightly softer crust (though bread flour is preferred for the best texture).
- Use filtered or spring water if your tap water is heavily chlorinated for better yeast activity.
- Replace instant yeast with active dry yeast, but remember to proof it in warm water first.
- Add herbs like rosemary or thyme to the dough for an herby twist.
- Mix in 1/4 cup of whole wheat flour for a heartier loaf with added nutrition.
Easy-to-Miss Gotchas
-
Water temperature matters: Using water that’s too hot can kill the yeast, while cold water slows fermentation. Room temperature water is ideal.
-
Don’t skip the stretch and folds: This step develops gluten gently and improves the bread’s structure without heavy kneading.
-
Let the bread cool completely before slicing: Cutting too early can result in a gummy texture.
-
Use a sharp blade to score: A dull knife will tear the dough instead of allowing it to expand properly.
-
Ensure proper humidity in the oven: Steaming helps develop the signature crust, so don’t skip adding water or using a Dutch oven if possible.
Leftovers & Meal Prep
This Rustic Italian Bread keeps well for up to 3 days at room temperature if wrapped loosely in a paper bag or a bread box. For longer storage, slice the loaf and freeze the slices in a zip-top bag. Toast the frozen slices directly for a quick breakfast or snack.
Leftover bread is perfect for making croutons, bread pudding, or a classic Italian panzanella salad. Simply cube the bread, toss with olive oil and seasonings, and bake until crisp for croutons, or soak in your favorite dressing for a fresh salad.
Helpful Q&A
Can I use all-purpose flour instead of bread flour?
Yes, you can substitute all-purpose flour, but keep in mind that bread flour has a higher protein content, which helps create the chewy texture and strong gluten structure typical of Rustic Italian Bread. Using all-purpose flour will result in a slightly softer, less chewy loaf.
What if I don’t have instant yeast? Can I use active dry yeast?
You can use active dry yeast, but it needs to be activated first. Dissolve it in a small amount of warm water (about 100°F/38°C) with a pinch of sugar and let it bubble for 5-10 minutes before adding it to your dough. Instant yeast can be mixed directly with the dry ingredients.
Why is my bread dense instead of light and airy?
A dense loaf often results from under-proofing, meaning the dough didn’t rise enough before baking. Make sure to allow the dough to ferment until it’s noticeably puffed and passes the “poke test” — when you gently press the dough, it should spring back slowly. Also, be careful not to over-knead or over-handle the dough, which can deflate those essential air bubbles.
How do I get that beautiful crackly crust?
The crust forms best when there’s steam in the oven during the first part of baking. Using a Dutch oven traps moisture, creating steam naturally. If you’re baking on a sheet, add a pan of hot water to the bottom of the oven to generate steam. Also, baking at a high temperature (450°F/230°C) helps develop a deep golden crust.
Hungry for More?
If you love this Rustic Italian Bread, why not try adding your own twist next time? Incorporate olives, sun-dried tomatoes, or even some roasted garlic into the dough for a flavorful upgrade. You might also enjoy pairing this bread with homemade soups, fresh salads, or classic Italian dishes like bruschetta or caprese.
For more delicious, approachable baking recipes, be sure to check out other bread recipes that bring the warmth of homemade baking right to your table. Bread making is a journey, and each loaf you bake brings you closer to that perfect, personalized recipe that will impress friends and family alike.
Enjoy the process, and happy baking!
Rustic Italian Bread
Ingredients
Equipment
Method
- In a large mixing bowl, combine 2 cups (250g) bread flour with 1/4 teaspoon instant yeast. Pour in 1 cup (250ml) water at room temperature. Stir until a shaggy dough forms. Cover and let rest for 30 minutes.
- Add the remaining 3 cups (375g) bread flour, 1 teaspoon instant yeast, 1 1/3 cups (333.33ml) water, and 2 teaspoons salt to the bowl. Mix until well combined.
- Cover the bowl and let the dough ferment at room temperature for about 1 hour, performing stretch and folds every 20 minutes.
- Turn the dough out onto a floured surface and shape into a round loaf. Place seam-side down on parchment paper.
- Cover loosely and let rise for another 45 minutes to 1 hour until slightly puffy.
- Preheat oven to 450°F (230°C). Transfer the dough into a hot Dutch oven or onto a baking sheet. Score the top of the loaf.
- Bake covered for 20 minutes, then uncover and bake for another 20 to 25 minutes until deeply golden.
- Remove from oven and cool on a rack before slicing.
Notes
- Use filtered water for better yeast activity.
- Let the bread cool completely before slicing to avoid gumminess.
- For a softer crust, substitute some bread flour with all-purpose flour.