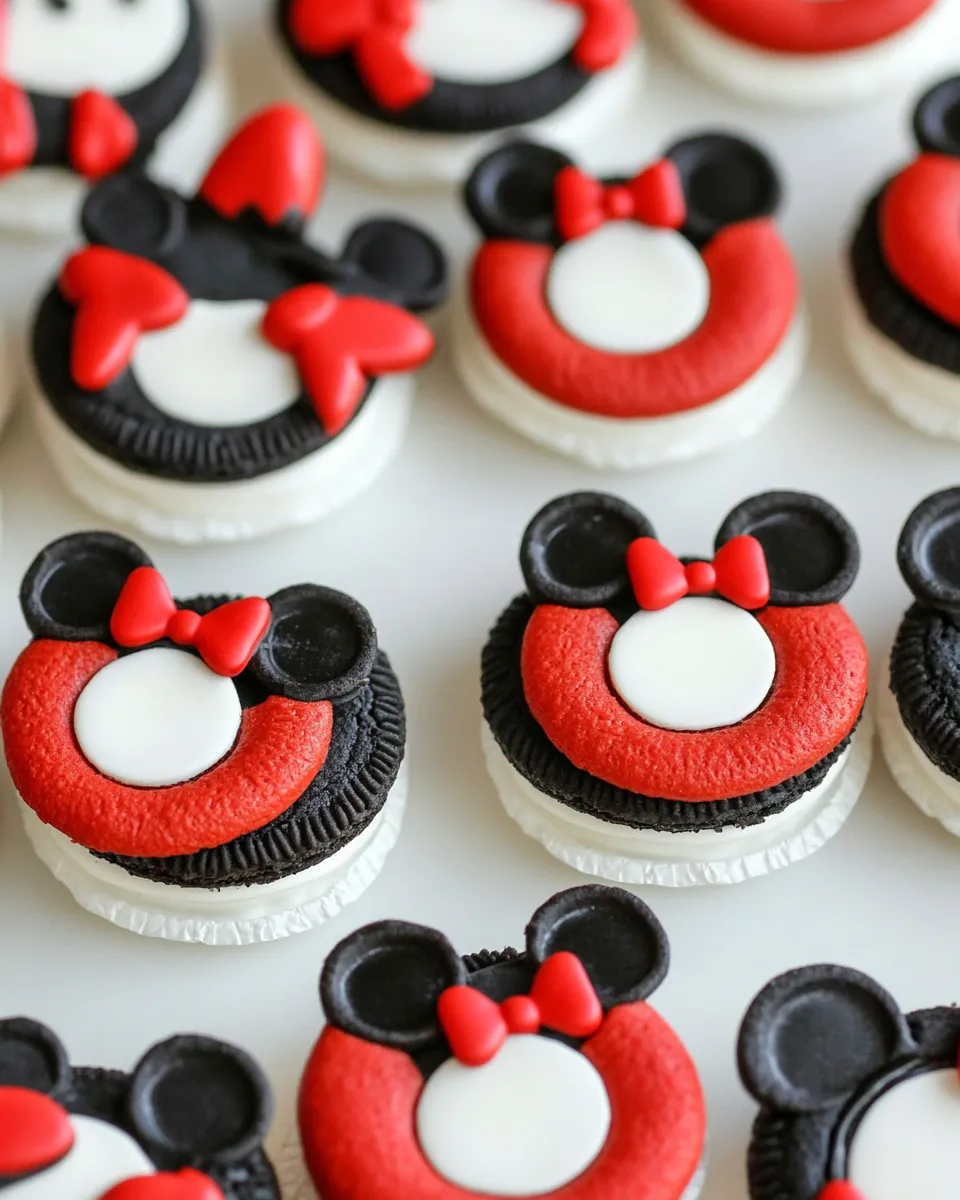
Mickey Mouse OREOS
Mickey Mouse OREOS are the perfect treat for any Disney fan or anyone looking to add a touch of whimsy to their dessert table. These deliciously fun treats capture the essence of everyone’s favorite mouse while also being incredibly easy to make. Whether you’re throwing a birthday party, hosting a Disney-themed gathering, or just want to delight your family with a unique dessert, these OREOS will steal the show. Let’s dive into the world of Mickey Mouse OREOS and discover how to create these delightful snacks!
Why This Recipe is a Keeper

This recipe is not just about aesthetics; it’s about flavors too. The combination of creamy filling and crunchy OREO cookies dipped in candy melts creates a delightful texture that everyone loves. These Mickey Mouse OREOS are not only visually appealing, but they also taste fantastic! Plus, you can customize them for various occasions. Kids will love helping out with the decorating process, making it a fun family activity.
Your Shopping Guide
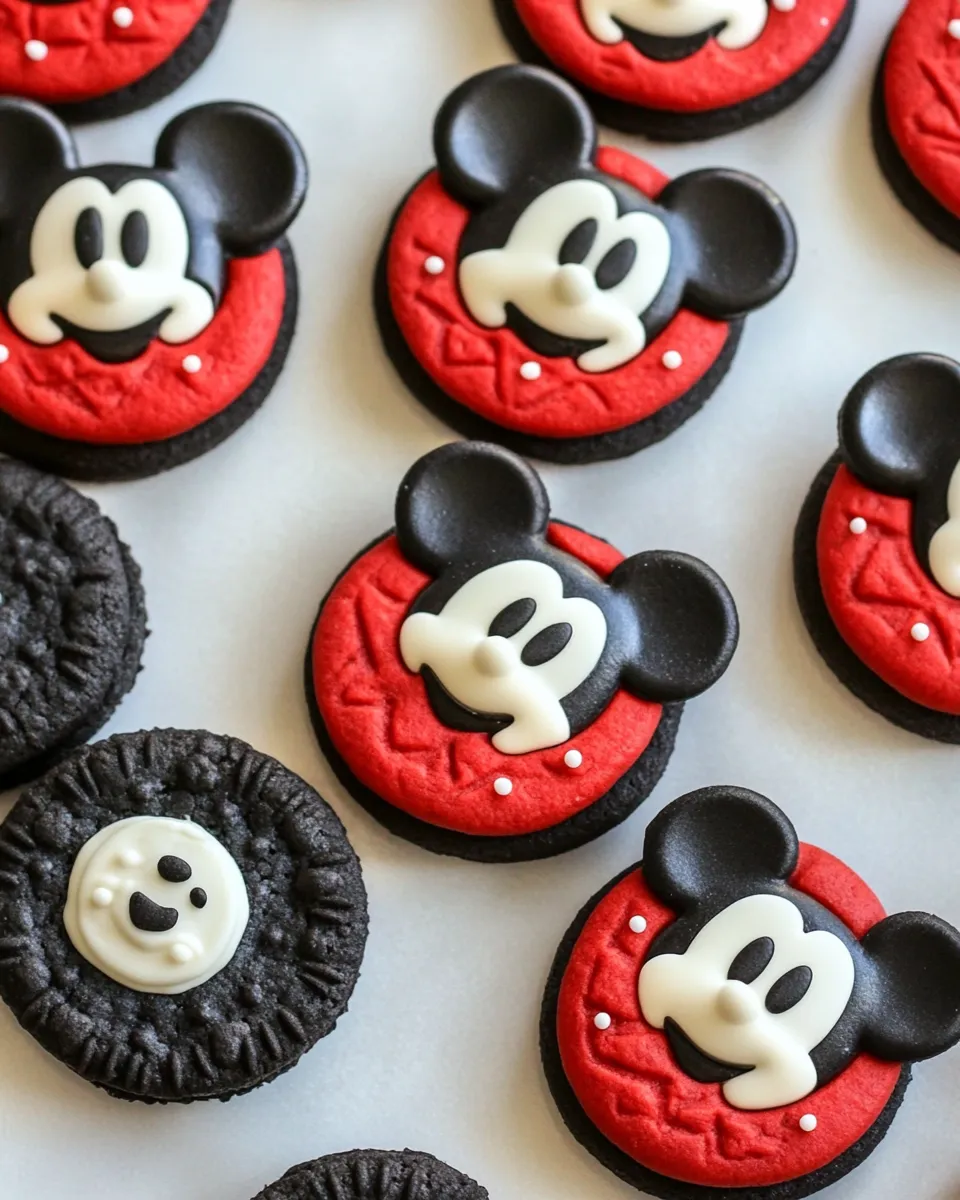
To get started, make sure you have the following ingredients and supplies on hand:
- 36 OREO cookies: The classic base for our Mickey Mouse creation.
- 1/2 bag of Red Wilton candy melts: For Mickey’s iconic red shorts.
- 1/2 bag of Black Wilton candy melts: For Mickey’s ears and face.
- 72 white ball sprinkles: These will serve as Mickey’s eyes and buttons.
- Tweezers (if needed): Perfect for placing the small sprinkles precisely.
Make sure to check for any special dietary needs when shopping for your ingredients!
Recommended Tools
- Microwave-safe bowl: For melting the candy melts.
- Cookie sheet: To place the dipped OREOS on while they set.
- Parchment paper: To line the cookie sheet for easy cleanup.
- Fork or dipping tool: For a smooth dipping process.
These tools will help streamline the process and make your candy-making experience enjoyable!
Cooking Mickey Mouse OREOS: The Process

Step 1: Prepare Your Workspace
Start by lining a cookie sheet with parchment paper. This will prevent the dipped OREOS from sticking and make cleanup a breeze.
Step 2: Melt the Candy Melts
In a microwave-safe bowl, melt the black candy melts according to the package instructions. Stir every 30 seconds until fully melted and smooth. Repeat this process with the red candy melts in a separate bowl.
Step 3: Dip the OREOS
Take an OREO cookie and dip it into the melted black candy melts, ensuring it is completely covered. Use a fork or dipping tool to lift it out, allowing any excess candy to drip off.
Step 4: Create Mickey’s Face
Place the dipped OREO on the lined cookie sheet. Repeat with the remaining OREO cookies. Allow the black chocolate to set for about 5-10 minutes at room temperature.
Step 5: Add Mickey’s Ears
Once the black candy coating has set, melt a little more black candy melts. Dip another OREO into the melted black candy and place it on top of the first OREO, creating Mickey’s ears.
Step 6: Decorate with Red Candy Melts
Using a spoon, drizzle the melted red candy melts over the bottom half of each Mickey OREO to form his iconic shorts. Allow it to set.
Step 7: Finish with Sprinkles
While the red candy melts are still soft, carefully place two white ball sprinkles on each OREO for Mickey’s eyes and one for his button. Use tweezers if needed for precision.
Step 8: Let Them Set
Allow the decorated OREOS to set completely at room temperature or refrigerate for faster results.
Better Choices & Swaps
If you want to customize your Mickey Mouse OREOS, consider these alternatives:
- Dark chocolate melts: For a richer flavor instead of black candy melts.
- Colored sprinkles: Use red or yellow sprinkles to represent Mickey’s shorts.
- Dairy-free candy melts: For those with dairy sensitivities, opt for dairy-free versions.
- Gluten-free OREOS: If gluten is a concern, substitute with gluten-free OREOS.
These swaps can make your treats even more personalized to suit your dietary preferences.
What Could Go Wrong
While making Mickey Mouse OREOS is straightforward, a few things can go awry:
- Candy melts seizing: If overheated, candy melts can seize and become unusable. Always melt in short intervals.
- Cookies breaking: Be gentle when dipping; OREOS can be fragile.
- Melted candy not setting: Ensure your melted candy is at the right consistency; it should be smooth and not too thick.
- Decoration slipping: If the candy melts cool too much before decorating, the sprinkles may not stick.
Keep these common pitfalls in mind, and you’ll be on your way to perfect Mickey Mouse OREOS!
Refrigerate, Freeze, Reheat
These delightful treats can be stored with care:
- Refrigerate: Store in an airtight container in the fridge for up to a week.
- Freeze: You can freeze the OREOS for up to a month. Just make sure they are in an airtight container.
- Reheat: If you plan to serve them warm, let them sit at room temperature for a few minutes before enjoying.
This storage advice ensures your Mickey Mouse OREOS stay fresh and delicious.
Your Questions, Answered
Can I make these OREOS in advance?
Absolutely! These OREOS can be made up to a week in advance. Just store them in an airtight container to keep them fresh.
What can I use instead of candy melts?
You can use chocolate chips or chocolate bars, but make sure to temper them correctly for a smooth finish.
Can I add other decorations?
Yes! Feel free to get creative with your decorations by adding edible glitter, colored icing, or themed sprinkles.
How do I prevent the candy melts from hardening too quickly?
Work in small batches and keep the melted candy in a warm area to maintain its fluidity. You can also microwave it briefly if it starts to harden.
The Takeaway
Mickey Mouse OREOS are not just a fun treat; they are a delightful experience that brings joy and creativity into the kitchen. With their charming design and delicious flavor, these treats are bound to be a hit at any gathering. Whether you’re making them for a special occasion or just for fun, these OREOS are sure to bring smiles to everyone’s faces. So gather your ingredients, invite your friends or family, and get ready to create magical Mickey Mouse OREOS that everyone will love!
Mickey Mouse OREOS
Ingredients
Equipment
Method
- Line a cookie sheet with parchment paper to prevent sticking and ease cleanup.
- Melt the black candy melts in a microwave-safe bowl, stirring every 30 seconds until smooth. Repeat with red candy melts in a separate bowl.
- Dip an OREO cookie into the melted black candy melts, ensuring it is completely covered. Lift it out with a fork, allowing excess to drip off.
- Place the dipped OREO on the lined cookie sheet. Repeat with remaining OREO cookies and allow to set for 5-10 minutes.
- Melt more black candy melts and dip another OREO, placing it on top of the first for Mickey’s ears.
- Drizzle melted red candy melts over the bottom half of each Mickey OREO to form his shorts, then allow to set.
- While the red candy melts are still soft, place two white ball sprinkles for eyes and one for the button.
- Allow the decorated OREOS to set completely at room temperature or refrigerate for faster results.
Notes
- Store OREOS in an airtight container in the fridge for up to a week.
- Freeze for up to a month in an airtight container.
- Reheat at room temperature before serving if desired.