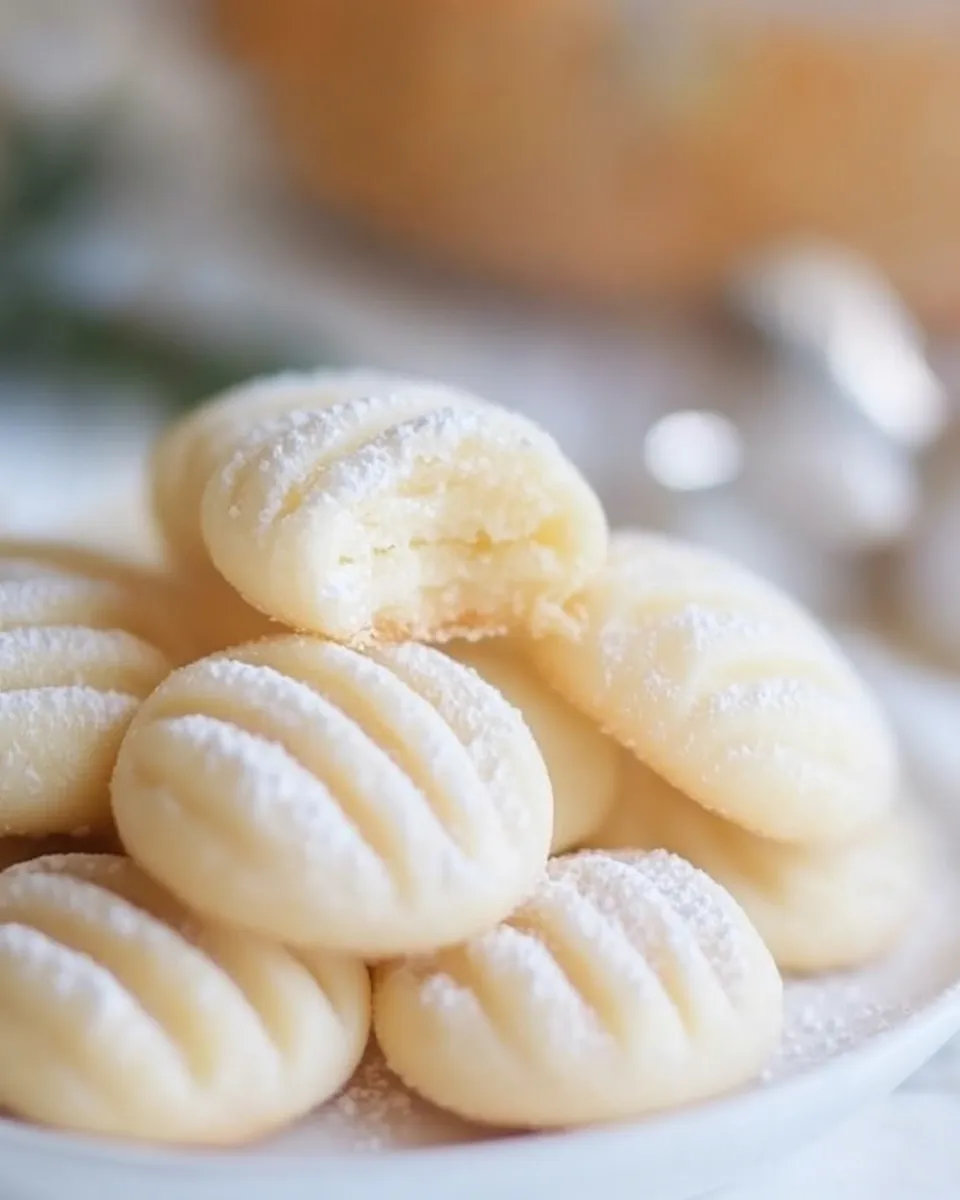
Melting Moments Cookies
If you’re looking for a cookie that literally melts in your mouth, you’ve come to the right place! Melting Moments Cookies are delightful little treats that bring joy with every bite. Their buttery, tender texture is complemented by a subtle sweetness, making them perfect for any occasion. Whether you’re hosting a tea party, celebrating a birthday, or simply satisfying a sweet tooth, these cookies are sure to impress. Let’s dive into the world of Melting Moments Cookies and explore how to make them at home.
Why It’s My Go-To
Melting Moments Cookies are a staple in my baking repertoire for a multitude of reasons. Firstly, they’re incredibly simple to make, requiring minimal ingredients that you likely already have in your pantry. Secondly, the flavor is wonderfully light, thanks in part to the use of potato starch, which gives them that signature melt-in-your-mouth quality. Lastly, they’re versatile! You can easily customize them with different flavors or fillings, making them a delightful treat for any palate.
Gather These Ingredients
To whip up a batch of Melting Moments Cookies, you’ll need the following ingredients:
- 125g (4 oz) salted butter, at room temperature – This forms the base of the cookie, lending richness and flavor.
- 40g (1 oz) powdered sugar – This sweetens the dough and helps create a tender texture.
- 1/4 teaspoon pure vanilla extract, optional – A hint of vanilla enhances the overall flavor.
- 125g (4 oz) potato starch (preferred) or corn starch – This ingredient is key for that melt-in-your-mouth texture.
- 80g (2 oz) cake flour – This adds a bit of structure to the cookies.
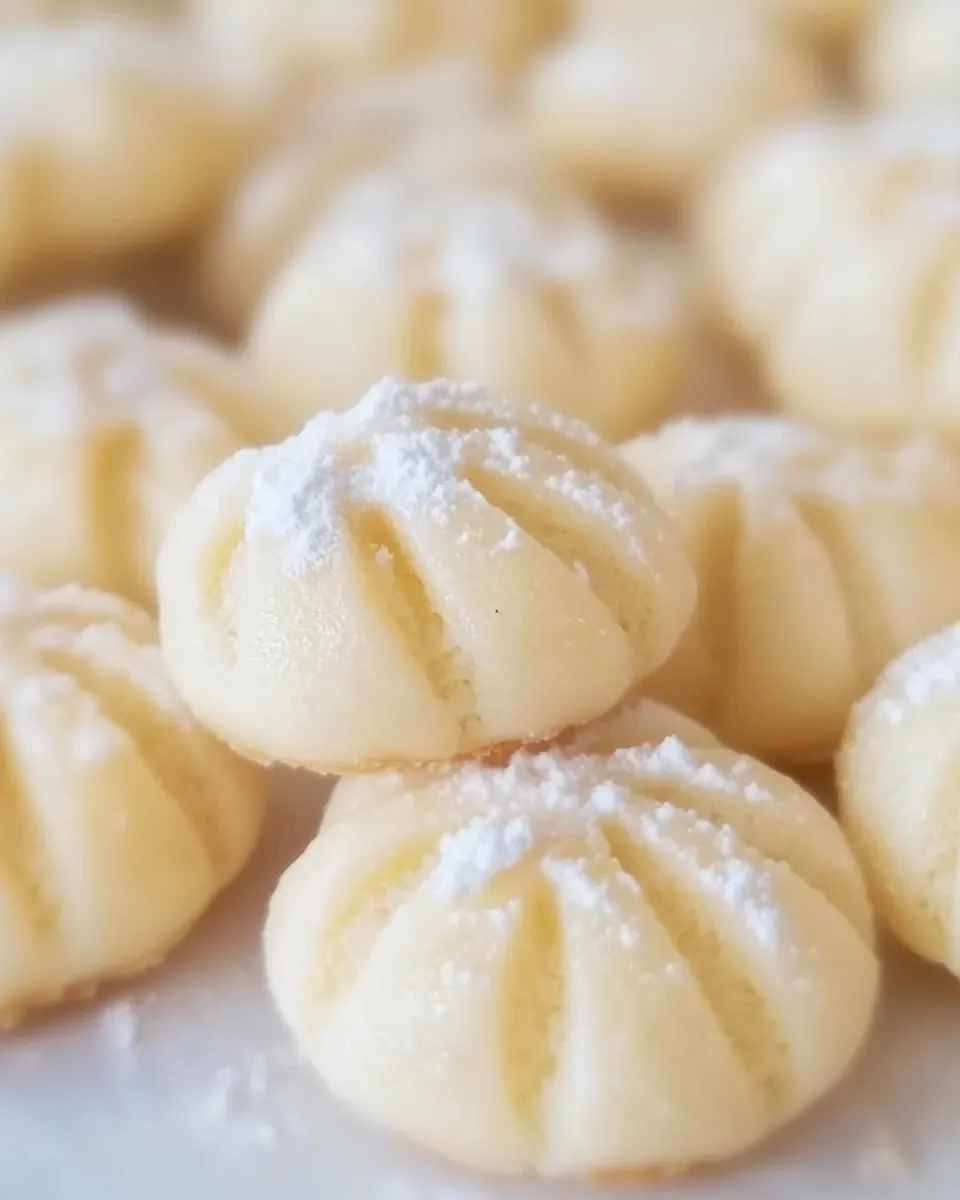
- Powdered sugar, for dusting cookies – A final touch to add sweetness and presentation.
Equipment & Tools
Before you start baking, gather the following equipment and tools:
- Mixing bowl – For combining the ingredients.
- Electric mixer – To cream the butter and sugar until light and fluffy.
- Spatula – For folding in the dry ingredients gently.
- Baking sheet – To place your cookies on while they bake.
- Parchment paper – To line the baking sheet for easy cleanup.
- Sifter – For sifting the powdered sugar and ensuring the dry ingredients are lump-free.
How to Prepare Melting Moments Cookies
Now that you have everything ready, let’s get started on making these delectable cookies!
Step 1: Preheat the Oven
Preheat your oven to 160°C (320°F). This ensures that the cookies bake evenly and achieve that perfect melt-in-your-mouth texture.
Step 2: Cream the Butter and Sugar
In a mixing bowl, add the room temperature salted butter and powdered sugar. Using an electric mixer, beat them together on medium speed until the mixture is light and fluffy. This step is crucial as it incorporates air into the mixture, helping the cookies rise slightly while baking.
Step 3: Add Vanilla Extract
If you’re using vanilla extract, add it to the creamed mixture and beat until combined. The vanilla adds a lovely depth of flavor to your cookies.
Step 4: Sift the Dry Ingredients
In a separate bowl, sift together the potato starch and cake flour. This helps to eliminate any lumps and ensures that the dry ingredients are well combined.
Step 5: Combine Wet and Dry Ingredients
Gradually add the sifted dry ingredients to the creamed butter and sugar mixture. Using a spatula, fold the ingredients together gently until just combined. Be careful not to overmix, as this can lead to denser cookies.
Step 6: Shape the Cookies
Using your hands, take small amounts of dough and roll them into balls, about 1 inch in diameter. Place them onto a baking sheet lined with parchment paper, spacing them about an inch apart.
Step 7: Bake the Cookies
Bake in the preheated oven for 12-15 minutes, or until the edges are just starting to turn golden. Keep an eye on them to avoid overbaking, as the goal is for them to remain soft.
Step 8: Cool and Dust
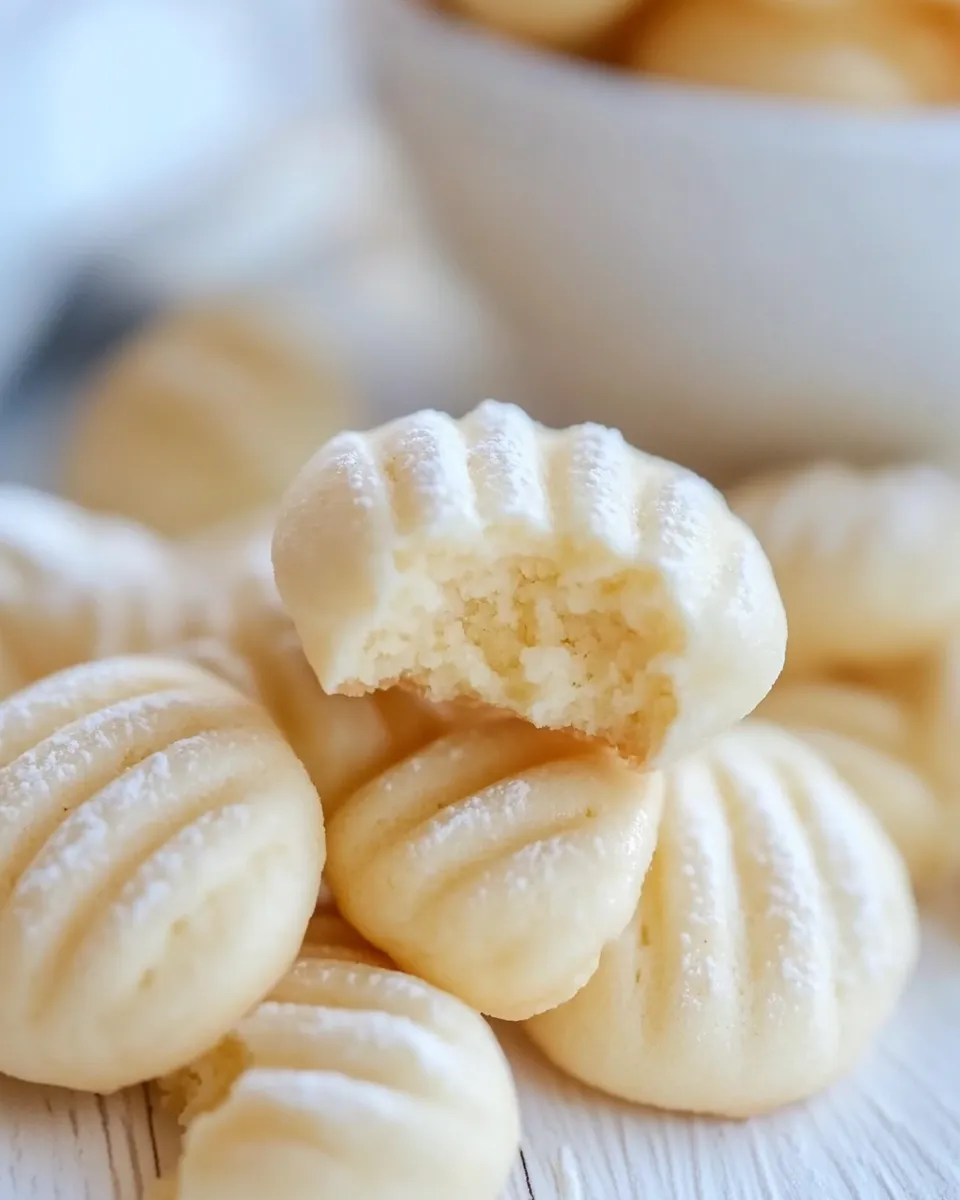
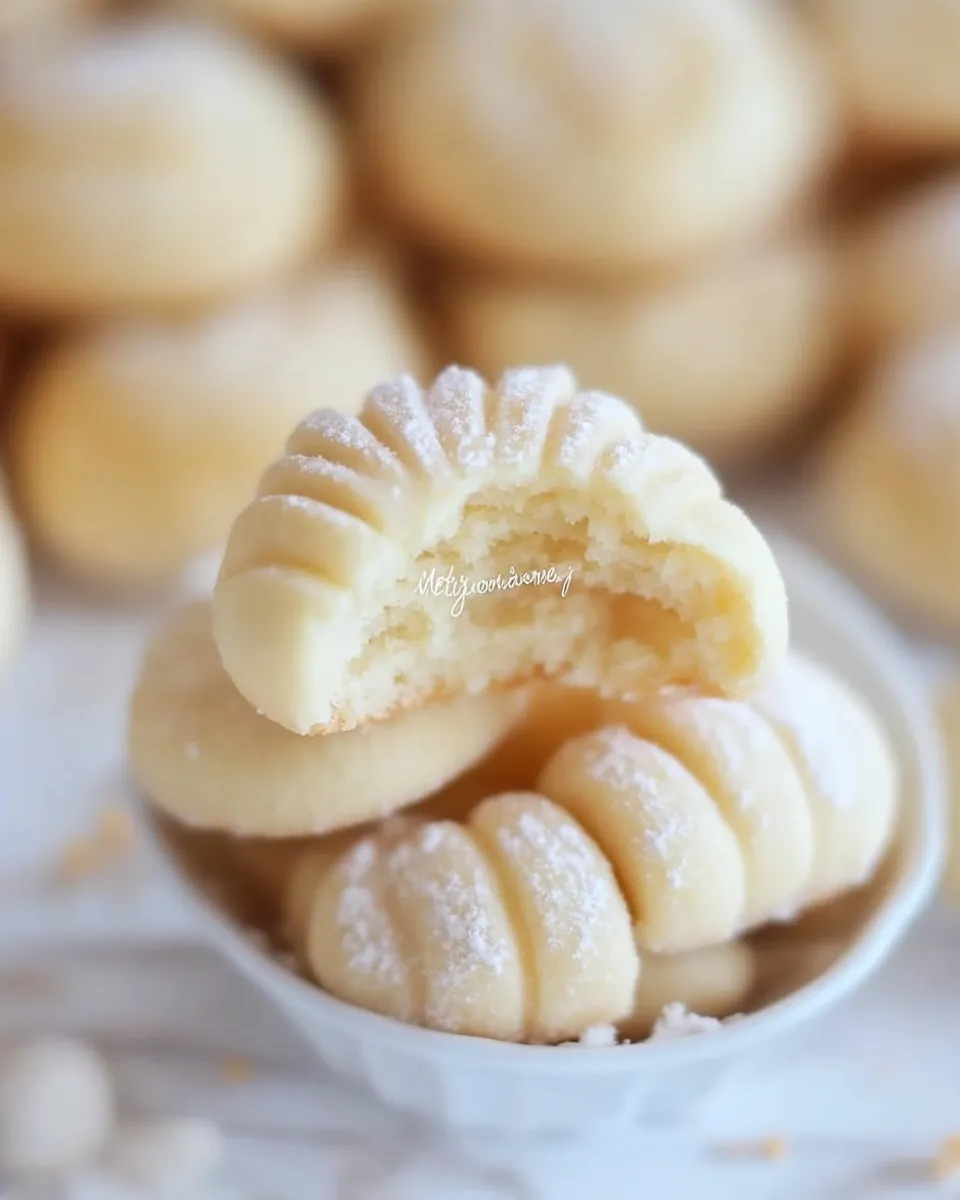
Once baked, remove the cookies from the oven and let them cool on the baking sheet for a few minutes. Then, transfer them to a wire rack to cool completely. Once cooled, dust them generously with powdered sugar for a beautiful finish.
Seasonal Twists
While the classic Melting Moments Cookies are incredible on their own, here are some seasonal twists to elevate your baking game:
- Chocolate Melting Moments: Add 2 tablespoons of cocoa powder to the dry ingredients for a rich chocolate flavor.
- Citrus Burst: Incorporate the zest of one lemon or orange into the dough for a refreshing twist.
- Nutty Flavor: Fold in finely chopped nuts like almonds or hazelnuts for added texture and flavor.
- Spiced Melting Moments: Mix in a pinch of cinnamon or nutmeg for a warm, cozy flavor, perfect for the fall.
Pitfalls & How to Prevent Them
Making Melting Moments Cookies is generally straightforward, but here are some common pitfalls and how to prevent them:
- Overmixing: Overmixing can lead to tough cookies. Mix until just combined for the best texture.
- Too Warm Dough: If your dough is too warm, the cookies may spread too much while baking. Chill the dough in the fridge for about 30 minutes if it feels too soft.
- Not Enough Powdered Sugar: If you don’t use enough powdered sugar, the cookies may not have the right level of sweetness. Always measure accurately.
- Underbaking: These cookies should be lightly golden at the edges but still soft in the center. If in doubt, bake a minute longer.
Store, Freeze & Reheat
To keep your Melting Moments Cookies fresh, follow these storage tips:
Store the cookies in an airtight container at room temperature for up to a week. If you want to make them ahead of time, these cookies freeze beautifully! Simply place them in a single layer in a freezer-safe container, separating layers with parchment paper. They can be frozen for up to three months. When you’re ready to enjoy them, let them thaw at room temperature. For a little extra softness, you can warm them in the microwave for a few seconds before serving.
Frequently Asked Questions
Can I use unsalted butter instead of salted butter?
Yes, you can use unsalted butter. Just add a pinch of salt to the mixture to ensure the flavor is balanced.
What can I use instead of potato starch?
Corn starch is a suitable alternative if you don’t have potato starch on hand. However, potato starch is preferred for achieving the best texture.
How do I know when the cookies are done baking?
The cookies should be lightly golden on the edges but still soft in the center. They will firm up as they cool.
Can I add chocolate chips to the dough?
Absolutely! Adding chocolate chips can enhance the flavor and make these cookies even more delicious. Just fold them in gently with the dry ingredients.
Ready to Cook?
Now that you have all the details, it’s time to roll up your sleeves and bake some Melting Moments Cookies! With their tender, buttery texture and delicate sweetness, they are sure to become a favorite in your household. Happy baking!
Melting Moments Cookies
Ingredients
Equipment
Method
- Preheat your oven to 160°C (320°F) to ensure even baking.
- In a mixing bowl, cream together the room temperature salted butter and powdered sugar until light and fluffy.
- If using, add the pure vanilla extract and mix until combined.
- Sift together the potato starch and cake flour in a separate bowl to eliminate lumps.
- Gradually combine the sifted dry ingredients with the creamed mixture using a spatula, folding gently until just combined.
- Roll the dough into 1-inch balls and place them on a baking sheet lined with parchment paper.
- Bake for 12-15 minutes or until the edges are lightly golden.
- Let the cookies cool on the baking sheet for a few minutes, then transfer to a wire rack to cool completely. Dust with powdered sugar before serving.
Notes
- Store cookies in an airtight container at room temperature for up to a week.
- Freeze cookies in a single layer for up to three months, separating layers with parchment paper.
- For a softer cookie, warm in the microwave for a few seconds before serving.